





最终效果图:

oauthviewcontroller.m
?| 1 2 3 4 5 6 7 8 9 10 11 12 13 14 15 16 17 18 19 20 21 22 23 24 25 26 27 28 29 30 31 32 33 34 35 36 37 38 39 40 41 42 43 44 45 46 47 48 49 50 51 52 53 54 55 56 57 58 59 60 61 62 63 64 65 66 67 68 69 70 71 72 73 74 75 76 77 78 79 80 81 82 83 84 85 86 87 88 89 90 91 92 93 94 95 96 97 98 99 100 101 102 103 104 105 106 107 108 109 110 111 112 113 114 115 116 |
//
// oauthviewcontroller.m
// 20_帅哥no微博
//
// created by beyond on 14-8-5.
// copyright (c) 2014年 com.beyond. all rights reserved.
// 授权控制器,仅运行一次,取得了当前用户的access_token和uid之后,存档,切换窗口的主控制器
#import "oauthviewcontroller.h"
@interface oauthviewcontroller ()<uiwebviewdelegate>
{
// 成员变量记住,不同方法中要用到
uiwebview *_webview;
}
@end
@implementation oauthviewcontroller
-(void)loadview
{
// 直接让webview成为控制器的view,避免再次添加
_webview = [[uiwebview alloc]init];
self.view = _webview;
}
- (void)viewdidload
{
[super viewdidload];
// 设置代理为当前控制器,以便监听webview的开始加载 和结束 加载
_webview.delegate = self;
// 申请认证的地址
nsstring *oauthurl = [nsstring stringwithformat:@"https://api.weibo.com/oauth2/authorize?client_id=%@&response_type=code&redirect_uri=%@",kappkey,kredirecturl];
// 调用分类的方法,加载申请认证的网址
[_webview loadurlstring:oauthurl];
}
#pragma mark - 代理 方法
// 开始加载
- (void)webviewdidstartload:(uiwebview *)webview
{
log(@"真的开始加载--%@",webview.request.url);
// 一开始加载就,显示进度条
mbprogresshud *hud = [mbprogresshud showhudaddedto:webview animated:yes];
hud.labeltext = @"页面加载中...";
}
// 是否开始加载某个页面
- (bool)webview:(uiwebview *)webview shouldstartloadwithrequest:(nsurlrequest *)request navigationtype:(uiwebviewnavigationtype)navigationtype
{
log(@"能否加载--%@",webview.request.url);
return yes;
}
// 页面加载完成
- (void)webviewdidfinishload:(uiwebview *)webview
{
log(@"加载完毕--%@",webview.request.url);
// 一旦加载完毕,就隐藏进度条
[mbprogresshud hideallhudsforview:webview animated:yes];
// 用户同意授权之后,返回的url包含授权的request_code,形如: http://www.abc.com/?code=888888888888
// 返回了用户授权的request_code的页面之后,需要截取code,然后继续拼接url,发起第3次请求(这次必须以post方式),最终返回需要的access_token
nsstring *redirecturlcontainscode = _webview.request.url.absolutestring;
// 分类方法,从左边标记字串的最后面开始,截取剩下的字符串
nsstring *code = [redirecturlcontainscode substrfromleftflagstr:@"?code="];
//如果 不是返回code的url,不做任何事情
if (code == nil) return;
// 现在准备发起最后一次请求,拼接第3次请求的需要的url,本次请求返回的东东,才会是最重要的用户的accesstoken,也包含了用户的uid
nsstring *accesstokenrequesturlstr = [nsstring stringwithformat:@"https://api.weibo.com/oauth2/access_token?client_id=%@&client_secret=%@&grant_type=authorization_code&redirect_uri=%@&code=%@",kappkey,kappsecret,kredirecturl,code];
// 1,创建url
nsurl *accesstokenrequesturl = [nsurl urlwithstring:accesstokenrequesturlstr];
// 2,创建post请求
nsmutableurlrequest *mutrequest = [[nsmutableurlrequest alloc]initwithurl:accesstokenrequesturl cachepolicy:nsurlrequestuseprotocolcachepolicy timeoutinterval:10];
//设置请求方式为post,默认为get
[mutrequest sethttpmethod:@"post"];
// 3,连接服务器,并接收返回的数据
nsdata *receiveddata = [nsurlconnection sendsynchronousrequest:mutrequest returningresponse:nil error:nil];
// 将服务器返回的数据转成字串(实质是json数据)
nsstring *responsestr = [[nsstring alloc]initwithdata:receiveddata encoding:nsutf8stringencoding];
log(@"response json is :%@",responsestr);
// 4,从responsestr中(实质是json数据)获取到access_token
// 将(json数据)转成字典先
nsdictionary *dictionary = [nsjsonserialization jsonobjectwithdata:receiveddata options:nsjsonreadingmutablecontainers error:nil];
// 通过键,取到access_token
nsstring *access_token = [dictionary objectforkey:@"access_token"];
log(@"access token is:%@",access_token);
// 通过键,取到用户的uid
nsstring *uid = [dictionary objectforkey:@"uid"];
log(@"uid is:%@",uid);
// 授权成功,切换根控制器到主控制器
uiactionsheet *actionsheet = [[uiactionsheet alloc]initwithtitle:@"授权成功" delegate:nil cancelbuttontitle:@"取消" destructivebuttontitle:@"确定" otherbuttontitles: nil];
[actionsheet showinview:self.view.window];
}
@end
|
补充说明:
第0步,
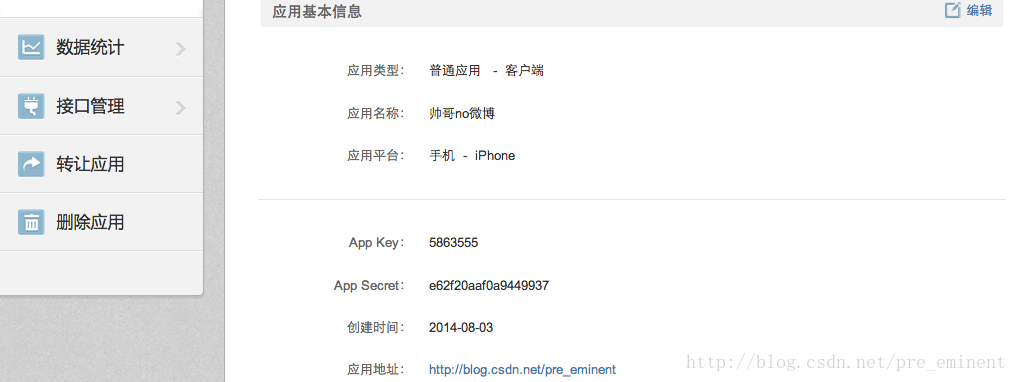
先注册成为开发者,验证邮箱之后,就可以创建移动应用,
记下系统自动为该应用生成的appkey和appsecret,
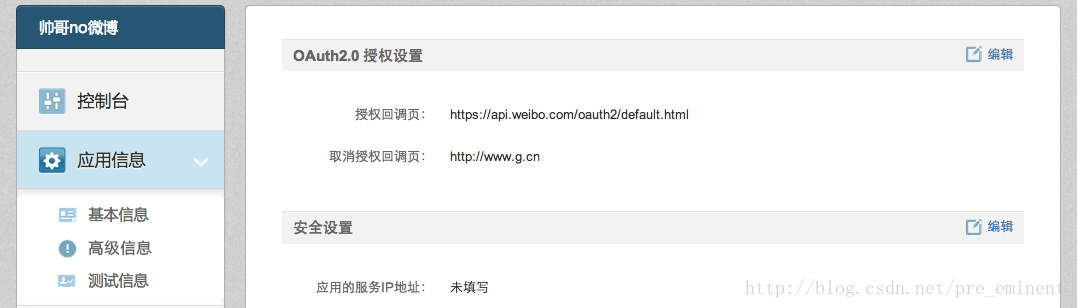
并在应用信息的高级信息中,设置授权完成的回调页面的地址redirect_uri
由于这里是手机客户端,而不是web应用,
因此创建应用的时候,redirect_uri可以随便写,
但必须全局都使用同一个地址redirect_uri
第1步,
申请未授权的request_code,
实质就是来到微博的登录页面,也就是_webview第一个加载的url
地址格式如下:
https://api.weibo.com/oauth2/authorize?client_id=appkey&response_type=code&redirect_uri=https://api.weibo.com/oauth2/default.html
appkey就是创建应用时,系统自动生成的唯一的应用id
redirect_uri,必需和创建应用时的自己填写的一致
第2步,
用户输入了帐号和密码之后,点击登录,
页面会自动转到授权页面,
用户如果点击授权按钮,此时,页面又会重定向到http://redirecturl/?code=888888888888,
要做的工作,就是截取这个重定向的url中的code值(每次都不一样),
这个code其实就是已经授权的request_code,
但是它只是中间人,并不能用它去获取用户的信息
地址格式如下:
https://api.weibo.com/oauth2/default.html?code=fa4efb6310411f948423e69adeabec08
第3步,
用第2步中截取的code,再次拼装url,
发起最后一次请求(必须是post请求),
此时,服务器返回的数据才是一个需要的json数据,
它里面包含三个键值对
?| 1 2 3 4 5 6 7 8 9 10 11 |
{
"access_token":"这个才是真正的access_token",
"remind_in":"157679999",
"expires_in":157679999,
"uid":"授权了的那个用户的uid"
}
|
 如果您对该产品感兴趣,请填写办理(客服微信:xiaoxiongyidong)



发表评论
◎欢迎参与讨论,请在这里发表您的看法、交流您的观点。